Personal measuring sensitivity of black and white films
Choosing suitable film for a special subject, is one of the secrets of success a photographer. In this case, knowing the sensitivity of the film is a great help to us, so we can predict, image quality, in terms of contrast, and fine and coarse grains.
During the develop of film, with the help of this information, We can control the efficiency developer soluble, or to compensate to decreased sensitivity the film, which occurred between production and consumption.
Why it is important to personal measuring sensitivity of the film?
Each photographer may work with different cameras. So the following errors may affect his work.
– Different cameras have a mechanical shutter, central shutter lenses, particularly large format camera is not really written on it. Therefore they provide a different times.
– The lens aperture may be not calibrated. This case is more evident in the large format camera lenses.
– The kinds of light meters have different performance. Even two similar light meter from a manufacturer, may be provide two different values of the intensity of a fixed light.
– Expiration date film might come to be. So the sensitivity of the film will be low. But, how much will decrease sensitivity of the film?
– The negative sensitivity described by the manufacturer, is measured according to the standard developer at certain time. If you are using other developer, such as fine green, sensitivity of the film will change. What will be developing time in this situation?
– The negative sensitivity described by the manufacturer, is suitable for printing by enlarger equipped with a condenser lens. If you use a diffuser enlarger, or you want to scan film, negative sensitivity will change.
– By measuring the sensitivity of the film, you can draw a sensitometry curve for the film. So, You can control the contrast and reaction of the film, against the light variations.
So, to overcome the problems described, it would be useful to personal measuring sensitivity of the film. But to measure the sensitivity of the film, we will need a densitometer.
Handmade densitometer device
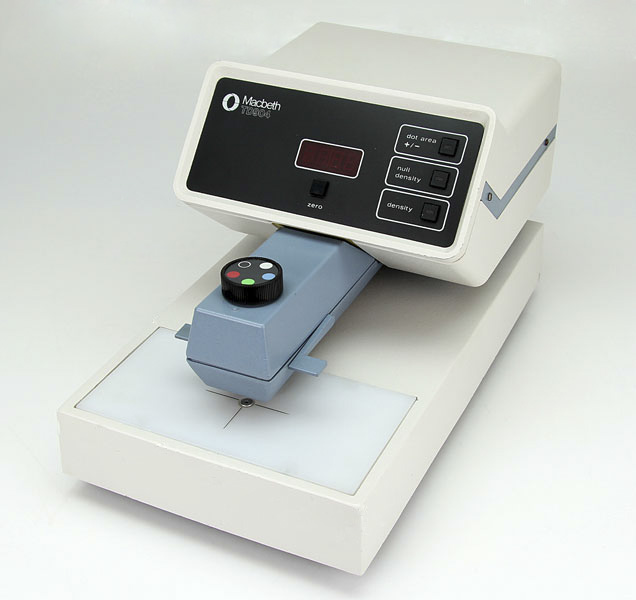
Various amounts of gray or black the film be measured using a device called a densitometer. This device works by using a photoelectric cell. Variety of models of this device is made, Macbeth TD-904 is one of the most famous. If this device is not available, We can compare developed tests with the standard samples by the visual method. But, by the visual method, in addition to having very low accuracy, we will not be able to draw a sensitometry curve.
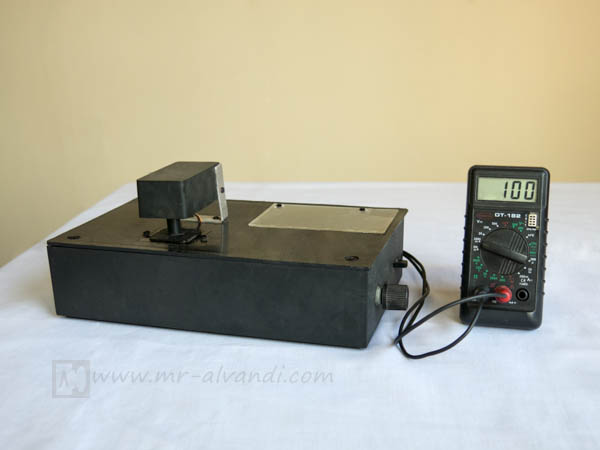
Densitometer devices must be able to measure the density of the dark in addition to the dark side, in the brightest of the film carefully. Because, brightest area of the film is very important.
I've made one of these devices. This device is composed of a tungsten light source and a reflector that directs the light straight form. Light manufactured for smoothly, passes through a diffuser and guided to the optical sensor.
Optical sensor is composed of a Selenium cell, it will convert absorbed light to electrical current. Electrical current strength generated by optical sensor, is measured by a micro-ammeter, and will be recorded based on the light intensity.
The densitometer can measure up to 3 Dmax. This amount density would be enough for black and white film perfectly. Because, the pore transmitted light is about 2 mm, the density can be measured in different areas of the film. So the densitometer will be useful to work with the Zone System.
How is density measured?
If a light beam as initial light, and the intensity I1 reach a film which has dark or the density is equal to D, it will exit after passing through the film, as a secondary light with the intensity I2.
If the amount of output light, be equal to one-tenth of the input light, film density would be equal to 1. If the amount of output light, be equal to one hundredth of the input light, film density would be equal to 2. If the amount of output light, be equal to thousandths of the input light, film density would be equal to 3. Note the following example:
The darkness or blackness or opacity is equal to:
| 10 | = | 100 candle | = | Input light | = | I1 | = | Opacity |
| 10 candle | Output light | I2 |
But, density is equal to the logarithm of the darkness:
Density = Log opacity
In this formula, I1 is the percentage of incoming light to the film, and I2 is the percentage of the light output of the film. So the blackness is obtained, by dividing the amount of input light onto output light, and density obtained from the logarithm of the opacity.
What is the sensitivity curve (Sensitometry)? How to determine the gray scale?
If we exposed to a layer of the film, with incremental steps, and then develop it, We see varying degrees of gray scale from white to black. Variations gray scale in this film, describes the film's type of behavior toward the light variations.
Sensitometry curve describes the behavior of film towards light variations.
| 1 | = | 100 | Log | = | I1 | Log | = | Density |
| 10 | I2 |
Example and following curve will clarify this issue.
Suppose, we exposed to four different film piece, respectively with an aperture stop difference. After develop, we examined respectively, opacities them by densitometer. Then as following curve, We plotted the changes in density ratio the intensity of light.
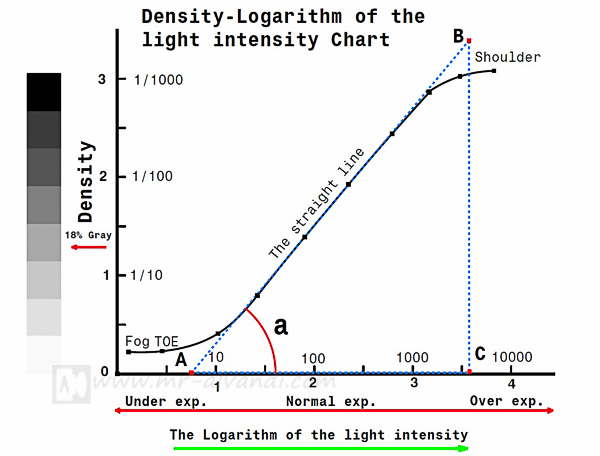
The horizontal axis of this curve is graded based on logarithm of the foot candle. Suppose, We exposed to the four points of film, respectively, 10, 100, 1000 and 10000 candle. And exposure time, is equal in all four cases. Therefore fourth point, which would be more black than others.
The vertical axis indicates the density. Thus, it illustrates the logarithm of input light relative to output light. This means, if into a part of the developed film, be radiated one hundred candles light intensity, and the other side, just out of ten candle light, the density of the film will be 1.
Now we need to draw the slope of the curve. The slope of the curve is an assumed line, it will pass through the flat part of the curve and cuts the horizontal axis.
The slope of the curve is important. The kind of films that have normal contrast, the slope of the curve, will have a 45° angle with the horizontal axis. For the kind of films that have soft contrast, the slope of the curve is closer to the horizontal axis, and the angle is less than 45°. And vice versa, for the kind of films that have hard contrast, the slope of the curve is farther to the horizontal axis, and the angle is greater than 45°.
Usually, high sensitivity films, has low contrast and the slope of less than 45°, and low sensitivity film has extreme contrast and more of a 45° slope of the curve.
The inferior region of the curve which is called Toe, is belonging to Underexpose region. And the upper region, which is known as the area of the Shoulder, is called Overexpose. These two regions, will have a different slope. This entry proves that there is a certain limit contrast in film, and since then every increase in amount of light, density will not change.
The correct exposure or Normal exposure, is done from the beginning to the end of the straight line on the curve. 18% gray card, located exactly in the middle of the straight line region.
Determining the gamma (contrast)
In sensitometry curve, gamma is obtained, from value of the tangent of the angle α. The angle α is the angle between the straight line curve with the horizontal axis. For more simple calculation, by using a ruler, draw a straight line on both sides of the curve, to cut the horizontal axis. In this case be obtained a right triangle. And so will be calculated tangent of angle α.
| 1 | = | BC | = | α | tan | = | Gamma |
| AC |
When gray levels changed strongly, in fact, the contrast of film is stronger. In these films increases tangent angle α. And briefly, gamma, which is the same as the contrast, increases. Now we learned how can stating, changing shades gray levels intensity in different films, with numbers.
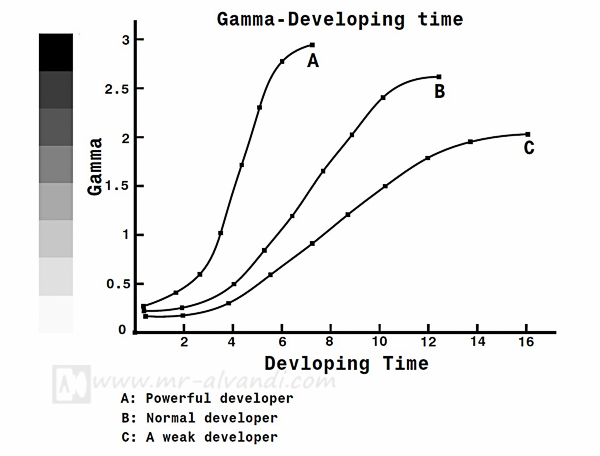
But it is very important the relationship between the developing solution with gamma. If we do develop the film with a distinctive developer, in different times, and drawing the curve for it, We conclude that increasing time of developing, to a certain amount may impact on the film. And after the passage of this limit, does not increase the maximum density and gamma in sensitometry curve. Thus can be achieved extent gamma and the maximum density. The high-powered developer solution creates high gamma and low-power developer solution produces negatives with low gamma.
Measuring and pers, sensitivity black and white film
Now that you are somewhat familiar with the theory above, we can determine the sensitivity of a film. This section consists of three parts, determine the sensitivity of the film, determine the developing time, at the end, sensitometry and calculated gamma curve, which will be presented in detail.
Measuring the sensitivity of the film
Equipment required:
– Camera and tripod
– Sheet or roll black and white film
– Fresh developer
– Densitometer
– Matt black cardboard with dimensions 70x70 cm
– Light meter
Instructions:
Usually I measure the sensitivity of sheet films. Because they are more controllable and repeatable. But this method with slight modification, also be used for roll films.
1– Cut six pieces of a flat film in total darkness with a width of 1-2 cm and numbering the fifth piece of them, and put them into the film holder. The sixth piece of is as blank (witness), restore it to the film box.
2– Install a matt black cardboard on the wall in a room with a window.
3– Set your camera to a distance of 1 to 2 meters of cardboard, and focus the lens to infinity.
4– If the room has a light bulb, turn it off. Matt black cardboard should only be lit by window light.
5– Check brightness different areas of matt black cardboard by using a light meter, brightness should be uniform in different regions. Then you measure the brightness the central region.
6– Adjust your light meter's sensitivity, ¼ less than the sensitivity reported by the manufacturer. For example, suppose the sensitivity of 400 ASA is reported by the manufacturer, now adjust the sensitivity of your light meter to 100 ASA.
7– Exposure to first negative, with 4 stops less than the sensitivity setting, in the previous step ASA 100(close the aperture 4 stop). For another 4 negatives, close the aperture ½ stop each time, and then the expose and note.
8– Now remove the films from the film holder and add the blank (witness) negative them.
9– Develop and dry 6 negatives at once, with the time of the manufacturer's recommendations.
10– After developing films, initially set the densitometer to 100% of the light passing through the film blank (witness). Then, measure and record the density of the films 1 to 5.
The method of calculating the film sensitivity
Were assumed, according to the manufacturer's film sensitivity is equal to ASA 400, and then ¼ sensitivity was selected, then the sensitivity of the light meter was adjusted to on ASA 100. Then again, we reduce the exposure to 4 stops. We exposed the first image. And for the next pictures, we reduced ½ stop the aperture.
After measuring the amount of light passing through the film, based on the following formula, we will calculate the density values.
| I1 | = | α | Log | = | Density |
| I2 |
Now we have prepared the following table:
| The original film sensitivity | ASA 400 | |
| ¼ the original sensitivity was selected | ASA 100 | density |
| First exposure | ASA 100 and 4 stop underexpose | log 100⁄40=0.40 |
| Second exposure | ASA 100 and 4 – ½ stop underexpose | log 100⁄50=0.30 |
| Third exposure | ASA 100 and 5 stop underexpose | log 100⁄60=0.22 |
| Fourth exposure | ASA 100 and 5 – ½ stop underexpose | log 100⁄70=0.15 |
| Fifth exposure | ASA 100 and 6 stop underexpose | log 100⁄79=0.10 |
According to the table and calculate the density, now we must find the density of 0.1. According to the definition, the sensitivity of the film is equal to the density of 0.1, plus darkness edge of the film.
We use the blank (witness) negative, remove darkness the edge of the film. This amount is located in the Toe region sensitivity curve. In fact, the density of 0.1, the minimum density that can be seen in the film. This amount will be 4 stops less than 18% gray darkness.
According to this table, the fifth exposure, has equal to 0.1 density. Because the fifth exposure, including ASA 100 with 6 stops less exposure, or ASA 400 with 4 stops less exposure, so sensitivity of the film is ASA 400.
Short description:
All light meters, are calibrated in such a way, that the darkness of the film achieved 18% gray or medium gray. This means that if we metering and shooting of a white screen, the colors in the image will be equal to 18% gray. And if we metering and shooting of a black screen, also achieved 18% gray.
According Zone system, which is provided by Ansel Adams, the darkness of is divided into 11 sections:
| Zone 0 | Pure black.Total black in the print. | |
| Zone I | Near black with slight tonality. no texture. | |
| Zone II | Textured black. The darkest part of the image in which slight detail is recorded. | |
| Zone III | Average dark materials and low values showing adequate texture. | |
| Zone IV | Average dark foliage. Dark stone. Landscape shadow. Recommended shadow value for portraits in sunlight. | |
| Zone V | Clear north sky (panchromatic rendering). Dark skin. Gray stone. Average weathered wood. Middle gray (18% reflectance). | |
| Zone VI | Average Caucasian skin. light stone. shadows on snow in sunlit landscapes. | |
| Zone VII | Very light skin. Light gray objects. Average snow with acute side lighting. | |
| Zone VIII | Whites with textures and delicate values (not blank whites). Snow in full shade. Highlights on Caucasian skin. | |
| Zone IX | Slight tone without texture. Glaring snow. Snow in flat sunlight. | |
| Zone X | Pure white. light sources and specular reflections. |
Each area is named Zone. Each Zone is equal to one-stop exposure difference with the adjacent Zone. Zone V is equivalent to 18% gray, and Zone I is the minimum density on the film, or the maximum recognizable black on paper. Zone VIII is also the maximum darkness on the negative, or minimum textured white, on paper. In fact, the spectrum of gray created in each image is placed in the 8 area. For example, Zone VIII represents the sun shining or the snow shining in the sun, and Zone I represents a very dark areas in the image.
Measuring the developing time
After determining the sensitivity of the film according to the previous step, you must determine the developing time of film, in the developer that you've used. This means that, what is the maximum black created by an developer, to achieved in the film, suitable gamma and density for printing on paper or scanning.
Equipment required:
– Camera and tripod
– Sheet or roll black and white film
– Fresh developer
– Densitometer
– Matt white cardboard with dimensions 70x70 cm
– Light meter
Instructions:
1– Put a sheet film into the film holder in the darkness. And consider one another as a blank (witness) negative.
2– Install on a wall, matt white cardboard on the outside of the house. So that the midday sun shine directly.
3– Set your camera to a distance of 1 to 2 meters of matt white cardboard, and focus your lens at infinity.
4– Adjust the sensitivity of the light meter according to the value obtained from the previous step.
5– Check the amount of light in different areas of the white board to be uniform. Then measure the amount of light in the central region.
6– Add 3 stops to the values measured by light meter. (open the aperture 3 stops)
7– Transfer rate of shutter speed and aperture to the camera and take a picture.
8– Cut exposed negative into 5 sections in total darkness, with a width of 1-2 cm. Develop and dry one section along, with developing time suggested by film manufacturer.
9– Adjust on 100% of the amount of light passing through the blank (witness) film on the densitometer, and then measure the density of the sample film developed in the previous step.
10– The density can be calculated according to the following formula. The amount of light passing through the film should be 0.1 to 0.3 percent.
| 2.52 | = | 100 | Log | = | I1 | Log | = | Density |
| 0.30 | I2 |
| 3 | = | 100 | Log | = | I1 | Log | = | Density |
| 0.10 | I2 |
Therefore density of exposed film will be about 2.5-3.
11– If the density is less than 2.5, add developing time from 12.5 to 25%. If the density is more than 3, reducing developing time from 12.5 to 25%.
Gamma in black and white negatives, should be equal to between 0.7 and 1. Under these conditions, we can control the printing contrast, with the use of soft, normal or hard contrast type papers.
Drawing Sensitometry curve, and calculate gamma
To investigate the negative behavior toward the light changes (negative contrast), the best method is to draw the curve sensitometry. This curve indicates the amount of negative contrast. Some manufacturers, to provide negative contrast curves, but the curve is better to be drawn by photographer, In such a case all parameters are standardized.
Method of drawing the curve Sensitometry
Equipment required:
– Camera and tripod
– Sheet or roll black and white film
– Fresh developer
– Densitometer
– Matt white cardboard with dimensions 70x70 cm
– Light meter
Instructions:
1– Numbering to 8 sheet film in total darkness and put within film holder.
2– Install on a wall, matt white cardboard on the outside of the house. So that the midday sun shine directly.
3– Set your camera to a distance of 1 to 2 meters of matt white cardboard, and focus your lens at infinity.
4– Adjust the sensitivity of the meter according to the value obtained from the previous step.
5– Measure the amount of light reflected from the matt white cardboard, and open the aperture 3 stops.
6– Transfer rate of shutter speed and aperture to the camera and take a picture.
7– For 7 other negative, respectively, close the aperture 1 stop each time and take a picture. So you will get 8 frame with one stop exposure difference.
8– Add one not exposed film, blank (witness), to the 8 previous frame, and then develop and dry the all 9 frames together, according to the developing time obtained of the previous stages.
9– Adjust on 100% of the amount of light passing through the blank (witness) film on the densitometer, Then measure and record the amount of light passing through the 8 other negative respectively. According to the following formula, to calculate density.
| I1 | Log | = | Density |
| I2 |
I've done the above steps, on the Ilford FP4 PLUS negatives following table.
| Negative number | The amount of light passing through a densitometer | The calculated density |
| blank (witness) | 100 | 0.00 |
| 1 | 77 | 0.11 |
| 2 | 56 | 0.25 |
| 3 | 25 | 0.60 |
| 4 | 11 | 0.96 |
| 5 | 3.1 | 1.50 |
| 6 | 1.0 | 2.00 |
| 7 | 0.5 | 2.30 |
| 8 | 0.3 | 2.52 |
Now we obtain the following curve:
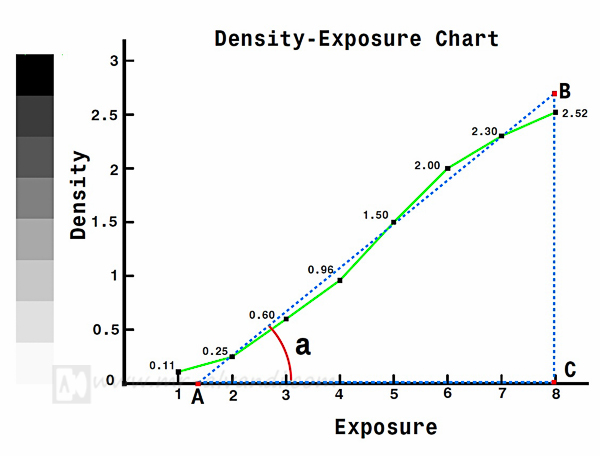
After the drawing curve, with the help of a ruler, draw the best straight line. Then extend it to cut the horizontal axis. Measure the length of the lines BC and AC by the ruler, and calculate the gamma value, according to the following formula.
| 1 | = | BC | = | α | tan | = | Gamma |
| AC |
Now you can judge about the negative contrast. If α angle is equal to 45 degrees, the tangent α is equal to 1 and negative has normal contrast. If α angle is less than 45 degrees, negative has soft contrast, and if more than 45 degrees, the contrast will be hard.
According to the curves drawn, you should try by using choose the appropriate developer and developing time, keep your negative gamma between 0.7 to 1. In this situation, the film has normal contrast, and easily by using soft or hard paper you can get the desired contrast.
Some needed advice:
– First, I recommend that, you choose a standard way for your work.
– Try the use of a kind of developer for your negatives.
– Record all your steps.
– If you do make an developer, established manufacturing conditions.
– You can use my method, How to develop black and white film?
– Keep in mind, an fine grain developer reduces the sensitivity to negative.
– If you have a large number of negatives of a brand, surely, you should be measure the sensitivity of the film and developing time.
– This method will cause the stabilize the quality of the negatives.
– Densitometer is a device that you can easily create.
– This guideline is an introduction to the activity, according to the Zone system method.

