How to develop black and white film?
In this article, I have tried to explain the method of development a variety of black and white negative film. So everyone can be the easiest way possible to development black and white film. In this guide, I try to give priority to the quality of the images. But to achieve this goal, it is better to have a brief information about the structure and function of black and white negatives.
Structure of black and white negatives
A variety of black and white negatives, due to their format, have a thickness of about 0.12 to 0.2 mm. But this small thickness, is composed of several layers. Each of these layers are responsible for a specific task.
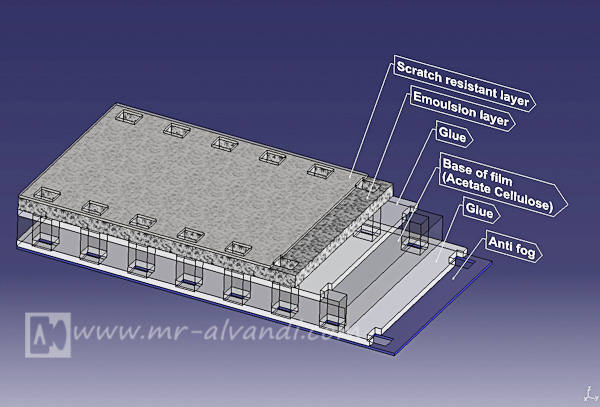
As shown in the top portion, is placed scratch-resistant layer. This layer has the duty to protect the underlying layers. Under this section, is located a mixture of gelatin and light-sensitive material, which will form the final image in this layer. Light-sensitive material is made from fine crystals of bromide, chloride and silver iodide in gelatin were mixed physically. This homogeneous mixture is called "Emulsion". There is also a certain amount of silver sulfide in the mixed emulsion. This material will have a very important role in image formation. Size, and kind of mixing crystals of bromide, iodide or chloride of silver in emulsion, will determine the negative sensitivity to light (ASA). Whatever their size larger, and silver iodide than, bromide and silver chloride is more, negative will be more sensitive (ASA above) , and vice versa. Remember, if silver chloride is too high, emulsion sensitivity is much low, that it would be suitable for photo printing paper.
The third layer consists of special glue, which causes the emulsion adhesion to the lower layer. The fourth layer is the main cortex of the film, usually made of cellulose or plastic compounds and is the emulsion preservative. This layer is cortical sturdy and also flexible. In the early years the history of photography, glass, were used in this segment.
The fifth layer is again a special adhesive. And the sixth layer was used an anti-halo material. The task of this layer is prevents light from reflecting back into the upper layers.
How is the image formed?
As mentioned, the emulsion is the main constituent the image. This section contains a variety of crystals, bromide, chloride and iodide of silver, is sensitive to light. Usually, the particle size of this crystals is about 0.002 micrometers. Again, remember, whatever this particle size is larger, the negatives would be more sensitive to light, but the image-forming grains are larger.
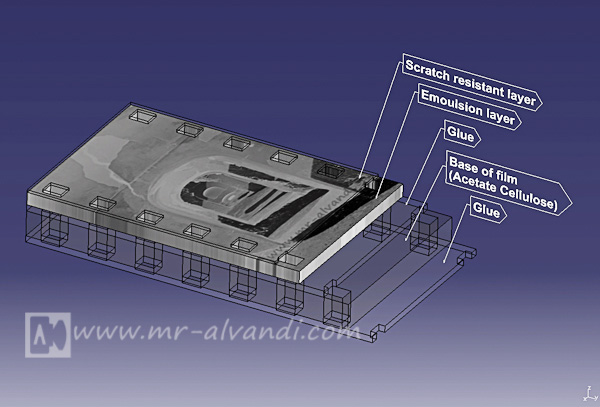
During shooting, when the light hit the surface of the film, silver halide crystals, affected by light, in a invisible interplay, silver metal grains are released. Initially, the bromide ions affected by of light, electrons are released, then, this electrons bonded with positive ions free silver, and with the help of silver sulfide, which is dispersed in the emulsion, are converted to metallic silver without electric charge. These grains are not visible until the developing by chemical solutions.
Black and white negatives development chemicals, is composed of two main solution, first developer and fixer. Developing solution , metallic silver produced, will turn to black silver. In fact, they build the image. Unchanged crystals, and other additional materials are removed from the emulsion by fixer solution. So after washing the film, the negative image is visible.
Developing B&W negative film
Equipment required
1– Developing tank for roll films, jobo special tank, or 3 pcs developing tray for sheet films
2– Thermometer 0 to 100° C
3– 1000 or 500 ml glass bottle or plastic accordion bottle for storage solutions
4– Glass marbles for filling empty space of solution bottles
5– Timer
6– Container to measure the volume of liquids (graduated cylinder)
7– Glass or plastic agitator
8– Plastic funnel
9– Film Clips for drying
10– Two-pan or digital balance with an accuracy of 0.1 grams and maximum 500 grams (if you want to make your own developer & fixer solutions)
11– Darkroom or changing bag
12– A place to drain rinse and add solutions
13– And of course, negative film, prepare for developing
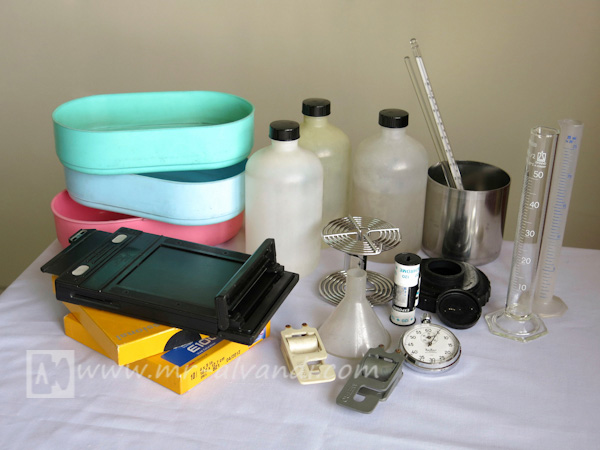
Developing tank
Developing tank is a chamber, the light can not penetrate into it, but you can, various liquids poured into it or through it to drain. Inside the chamber, placed a roll of film, or several sheet film, which was wrapped in a special reel. Developing tank has two separate doors. One, to put the reel through it, and another to enter and drain fluids. The body and reel developing tank, made of metal or plastic, but the type of metal (stainless steel) will be stronger and more resistant to chemical absorption. (The body of plastic tanks, due to the absorption of small quantities (trace) of some chemicals, because of creating the color cast are not recommended, especially for developing color slides)
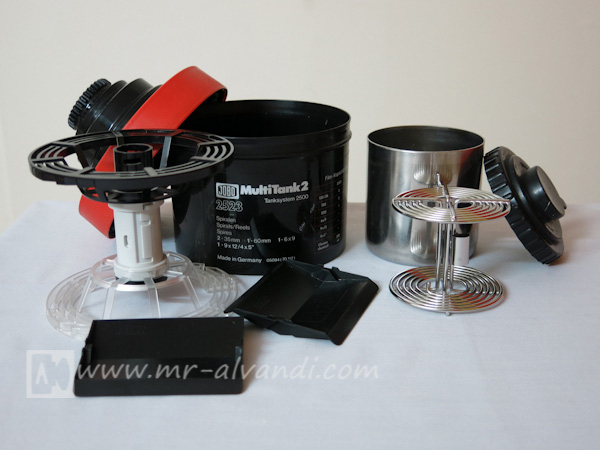
Usually developing tanks are made for roll film, but the jobo tank, in addition to roll film can be used kind of a 6X9cm, 9X12cm and 4X5in sheet film. Sheet films can also developing inside the darkroom into a small tray.
The temperature condition for developing black and white negatives:
Temperature of developer bath of black and white negatives, should be 20±2 degrees Celsius. Temperature of stop and fix bath are appropriate 20±3 degrees Celsius. But, i used all three solutions developer, stop, fix and also rinse to 20±0.5° C. As a result, consistently, images are fine grained and the final result can be replicated. I'll adjust in the winter, the temperature of all solutions to 22, and in the summer, 18 degrees. Because, during this process, solutions will be warmer in the summer, and cooler in winter.
It is important that all solutions have the same or nearly the same temperature. Suddenly changes in temperature will cause a wrinkle emulsion surface.
Bottles for storage solutions:
These containers are used for storing a variety of solutions. Amber brown glass type is more appropriate. For each solution, consider the special bottle. On them, record the name and date of the preparation. Do not apply any solution bottles elsewhere. Since these solutions are oxidized in the presence of atmospheric oxygen, the container doors must be completely prevents penetration of air into the bottle. Plastic bottles accordion, suitable for the removal of excess air above of surface solution. But for the removal of excess air above the solution in a glass bottle, you should use of glass marbles.
Timer:
Developing negative film process occurs during a specific time. Developing time depends on factors such as formulation, concentration, temperature (which we've stabilized at 20±0.5° C), sensitivity, exposure value, and etc. Usually, inside the box of negatives, recommended developing time with respect to temperature and concentration for several standard drug. If you use the recommended times, you will have negatives with contrast medium, and would be suitable for printing with a condenser enlarger on paper No. 2 (normal contrast). Usually increased to 25% develop time, equal to an increase of 1 stop of exposure, and vice versa.
Measuring volumetric containers:
I use the type of 100ml plastic graduated cylinder. It is very suitable for the construction of solution and dilution.
Balance:
If you want to make all of your solution, you'll need this tool. In this case, you will have the ability to manipulate in the variety of formulas. I've made a two-pan balance easily.
Dark Room:
Film must be in the total darkness within reel of developing tank. So you need a completely dark space like a darkroom. If the bathroom has no windows, it usually is appropriate for the job. For prevent the penetration of light into the bathroom, put a cloth around the door, and close the door. But other tools, which is pretty good, is film changing bag. The device includes a double bag with zipper that is black and has a special sleeves. You can put your hands up to the elbows in it, and loaded film in the reel tank.
Method of loading the film into the reel tank
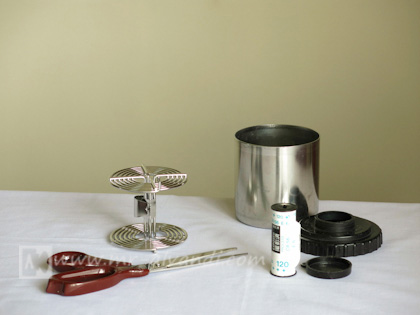
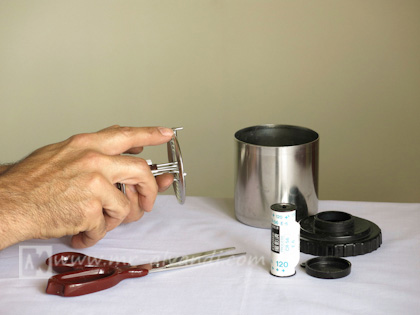
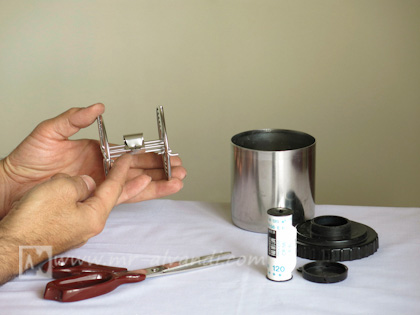
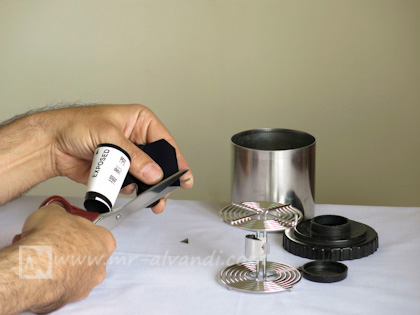
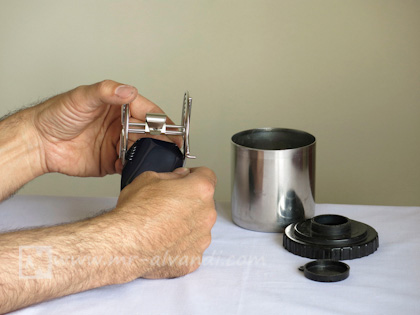
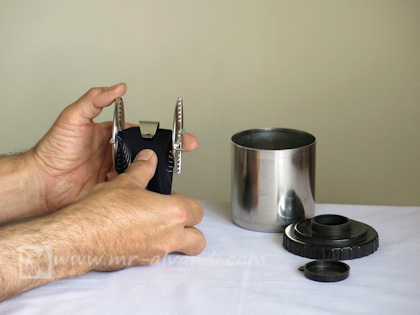
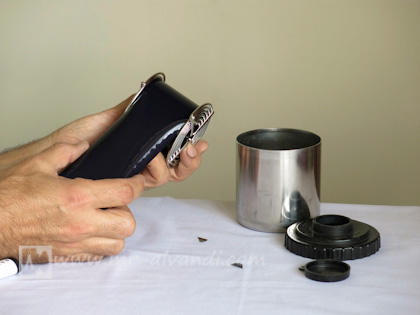
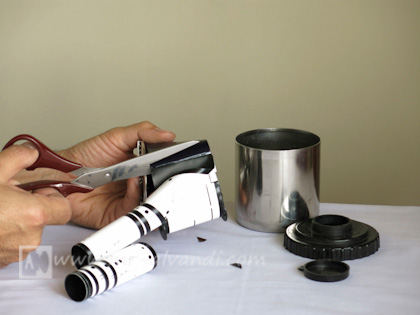
The various developing tanks have their own methods for loading film. My tank, is Kindermann type, and is loaded in accordance with the following images in total darkness. I recommend you practice several times this method in bright room with old Film, until you obtain the necessary experience.
The following steps must be done in the total darkness
Component of Developer solution:
The first solution, of black and white negatives process, is the developer solution. Task of this solution is the reduction of silver ions exposed to light, in the silver bromide crystals, and converting them to silver metal black. A process in which image will be revealed. This solution is comprised of several components.
1– Development agent:
This material is the main factor to reduction the silver in the solution. Different materials are responsible for reduction the silver. They will be used, according to contrast, density and grain size requirements. The most common of them is Hydroquinone (a strong agent and high contrast) the Metol or Monomethyl-p-aminophenol hemisulfate (gentle agent and low contrast) and Phenidone or 1-phenyl-3-pyrazolidinone (gentle agent and low contrast like Metol).2– Accelerator agent:
Developer agent has the ability to reduce silver metal, an alkaline environment. Thus, from accelerator agent will be used to create an alkaline environment. Whatever, the developer solution to be more alkaline, developing time will be less. Of course appearance rate should not be too high. Because it can cause fog and large grains in the film. Some accelerator agent include: sodium hydroxide, potassium hydroxide, sodium carbonate, sodium sulphite, borax.3– Restrainer agent:
This material prevented from fog on negatives. In fact reduces the processing speed. Especially in parts of the image, which are located in the shadow. Thus, the use of restrainer agent, will increase the contrast in the negative (By reducing the concentration of silver particles in the dark parts of the image, compared with the concentration of silver particles in the bright parts of the image). Benzotriazole and potassium bromide is the most common material.4– Preservative agent:
This material will be prevents the from oxidation of developing agent, in the presence of atmospheric oxygen. Sodium sulfite is the most common preservative agent.
Component of Stop solution:
Previously, it was said that the process is carried out in an alkaline environment. For stop processing, should be used a stop solution. Actually stop solution, is a weak acid solution, which when in contact with the surface of the film, remove the impact of developing solution. The most common is diluted acetic acid.
Component of Fixer solution:
As noted above, developing agent, has the duty to reduce silver ions exposed, and converting them to silver metal. Metallic silver developed, is represents exposed negative regions (bright areas of the subject). But, for represent unexposed regions of negative (dark areas of subject), should be removed from the emulsion other materials, including unexposed silver bromide crystals. Fixer solution, is responsible for the dissolve and removal of unexposed silver ions of negatives, and other additional materials. This solution is comprised of several components.
1– Fixing agent:
This material will lead to dissolve unexposed silver ions in their. Sodium thiosulfate and ammonium thiosulfate are the most common materials. Ammonium chloride, in the vicinity sodium thiosulfate, will produce ammonium thiosulfate. A recent material in addition to a strong constant agent, due to better dissolve in water, when washing the negatives compared to sodium thiosulfate, is easily separated from the emulsion. Thus, negative life will also increase.2– Preservative agent:
This material shall prevents the from decomposition fixing solution by excess acid. Eexcess acid, was transferred from the stop solution. Sodium bisulfite is the most common.3– Hardener agent:
This material is used in some fixing solution, prevent of inflation and softening the emulsion. Potassium alum (potassium aluminum sulfate) is the most common.Composition of weting agent (photo flo):
This solution is contains substances for lubricating washing water, before drying negative. To prevent from creation of a water deposit stains on the negatives. I am using a few drops of dish washing liquid in a quart of water.
Useful life of the solutions for black and white negatives
Photographic solutions, especially developing solutions, under the influence of light, oxygen, air, moisture and heat will spoil over time. The best place to store, is dark, cool and dry location. Bottle them should be dark with strong doors. Usually I'll use from glass marbles to fill the space above the solvent consumption. Approximate age of photographic solutions and depend on the type and condition maintenance. Usually manufacturers, determine and provide the approximate age of the solution, according to the following similar table.
| Type of solution | Concentrate solution stored in closed bottles | Solution prepared in the pan |
| Developer | Between 2-6 months depending on how much is used | Between 12-14 hours |
| Stop | Unlimited | About 3 days |
| Fix | Between 2-6 months depending on the number developed | A Week |
Maximum yield the solutions
The use of new solutions, is important to get good and consistent results. Weak and old solutions, makes images with poor tonality and blemishes. Weak stop solution, not effective, and soon corrodes the fix solution. And poor fix solution, creating an impoverishment of tonality. But almost yield the solutions are provided by the manufacturers. The table below is an example of this information.
| Type of solution | 35mm film, 36 exposures,based on roll |
| Developer | 4 |
| Stop | 15 |
| Fix | 25 |
A roll of 35mm film, 36 exposures, almost equivalent to the following values:
1 pcs 120 roll film
8 pcs 6x9cm sheet film
4 pcs 4x5in sheet film
2 pcs 5x7in sheet film
The easiest way to avoid the consumption of poor developing solution, concentrated preparation, and consumption ratio of 1+1 and 1+3 diluted solution and then disposing it. Thus, always will be consumed fresh solution and the uniform results.
Duration of fix bath, is usually double the time being colorless unexposed negatives. This time should be max between 5 to 8 minutes. To test the strength of fix solution, put a piece of unexposed photographic negatives to it, and shake frequently, up completely white negatives and be transparent. Duration of for transparency it, must not be more than 4 minutes. The old fix solution is often accompanied by precipitation. I'll use another method to estimate the strength of fix solution. I've added a few drops of 1.5% solution of potassium iodide in 5 ml of fix solution, if milky precipitate formed, the solution will not be available.
Preparation development solutions for black and white negative film
Various methods and formulas used for developing black and white film. A variety formulas have been introduced at different sites, some fine grain and others are full of contrast.
But after, a lot of experience with a variety of different methods and formulas, and measuring the density of dark and light areas of the negatives by densitometry, and applying techniques Zone system, and Sensitometry, i have reached the conclusion that the formula D-76 and D-23 Kodak easiest and best combination for me. I using the D-76, for standard developing with of medium contrast, and the D-23 to create fine grain image. D-76, is equivalent, ID-11 Ilford, and D-6 Dupont. This formula has a normal tone and contrast along with fine details in shadows and bright areas of the image. D-76 has the ability the compensation property. This means that, coincided with appearance of dark areas, bright areas of the image will have the appropriate details.
D-23 is one of the simplest formulation, which is much used by Ansel Adams. This formula makes the fine grain, and increase image resolution. Combining these two formulas are presented in the following table.
| 1 | Water 50° C | 750 ml |
| 2 | Metol | 2 gr |
| 3 | Sodium sulfite | 100 gr |
| 4 | Hydroquinone | 5 gr |
| 5 | Borax | 2 gr |
| 6 | Water | Up to 1000 ml |
| 1 | Water 50° C | 500 ml |
| 2 | Metol | 7.5 gr |
| 3 | Sodium sulfite | 100 gr |
| 6 | Water | Up to 1000 ml |
Preparation method the developer solution
Perform the following steps to prepare the developer solution:
1–Weigh, and solving Metol in water to 50° C.
2– Weigh sodium sulfite and slowly added to the above solution, and continuously stir until it is completely dissolved.
3– Weigh hydroquinone and added to the solution and stir continuously until it is completely dissolved.
4– Weigh borax and added to the solution and stir continuously until it is completely dissolved.
5– After complete dissolution of the material, transfer solution into the bottle, and dilute to 1000 ml. (Add enough water to reach the final volume to 1 liter)
6– Shake the bottle thoroughly until the solution becomes homogenous.
7– After cooling, the solution can be used.
Preparation method the stop solution
I am using concentrated acetic acid, 28% by weight. But I recommend people who haven't experience working with chemical solutions, especially acids, use of edible acetic acid, which has a concentration of about 2-5% and many stores are offering. In any case, the method of its preparation for both is listed below.
| 1 | Acetic acid 28% | 30 ml |
| 2 | Water | 970 ml |
| 1 | Food grade Acetic acid 5% | 150 gr |
| 2 | Water | 850 ml |
The values contained in the table, mixed with water and stir well. Stop solution is now available.
Preparation method the fix solution
This solution is used concentrated form, and will be returned after consumption to the bottle. As explained above, after some period of use, the ability should be measured. (A piece of unused negatives and put it in continuously shaken to be transparent and completely colorless negatives. Time to be transparent, not more than 4 minutes. Also above solution should be free of sediments). The following table shows composition of a sample of the fix solution, which i am using.
| 1 | Water 50° C | 750 ml |
| 2 | Sodium thiosulfate (hypo) | 240 gr |
| 3 | Ammonium chloride | 25 gr |
| 4 | Sodium bisulfite | 20 gr |
| 5 | Water | Up to 1000 ml |
1– First, Weigh and solving sodium thiosulfate in 750 ml of water 50° C.
2– Weigh ammonium chloride and added to the solution and stir continuously until it is completely dissolved.
3– Weigh sodium bisulfite and added to the solution and stir continuously until it is completely dissolved.
4– Now, dilute the solution to 1000 ml. (add enough water to reach the final volume to 1 liter)
Preparation method the photo–flo or weting agent solution
Of course can also be used prepared commercial solutions. But I am using a few drops of liquid dishwashing detergent in a 1000 ml of water to produce it.
Development process black and white negatives
The developing process of black and white film, including 4 solution in 8 phases. Required solution are developer, stop, fix and photo-flo. You can buy, a variety of packages ready-powder or concentrate it, and can be used according to the manufacturer's instructions. Or like me use raw material powder, and according to the formula above, or other formulation, please take action to prepare them. The table below shows the different stages of the process of developing black and white negatives.
| Step | Time | Storage Conditions | Working conditions – Temperture | Terms of stirring |
| Pre-Washing | 3 times, each time 1 minute | Drain to wastewater | Total darkness 20 ± 0.5 | Shake continuously |
| Developer | According film brochure and Concentration | Drain to wastewater | Total darkness 20 ± 0.5 | The first 45 seconds continuously, then every 30 seconds, 5 seconds shake |
| Washing | 3 times, each time 1 minute | Drain to wastewater | Total darkness 20 ± 1 | Shake continuously |
| Stop | 15-20 sec | Re-usable | Total darkness 20 ± 1 | Shake continuously |
| Washing | 3 times, each time 1 minute | Drain to wastewater | Total darkness 20 ± 1 | Shake continuously |
| Fix | 5-8 min | Re-usable | Total darkness 20 ± 1 | Shake continuously |
| Final Washing | 15-30 minutes with flowing water | Drain to wastewater | Lighting 20 ± 3 | Shake continuously |
| Photo-flo | 15-20 sec | Drain to wastewater | Lighting 20 ± 3 | Shake continuously |
Before you begin, please read instruction the film processing manufacturer. Due to the concentration of development solution, noted time of development proposed. I am using a solution of D-76 1+1, so for a roll of 120 film, i mix 150 cc the concentrate with 150 cc of water. After the finish the job, i discharge it in wastewater.
Start the development process of this way:
1– In the total darkness, you load the film, in the special reel tank, and close the tank door.
2– Please check the temperature to be 20 degrees Celsius.
3– Open the small door the tank, and the pre-washing done, and to discharge the water completely.
4– Add the diluted developer solution, and close the tank door. Simultaneously turn on the timer. Initially, drag upwards the bottom of the tank a few times, until the air bubbles are separated from the surface of the film. In the first 45 seconds continuously, upside down the tank, and then every 30 seconds for 5 seconds, it will upside down. During the 30 seconds, the tank to drop a resident. Put immobilized the tank within 30 seconds. (Do not shake the tank on a regular basis at this stage, it can cause negative of grainy)
5– Washing, stopping, and fixing steps, done accordance with above table.
6– After fixing stage, fill and drain the tank with water several times. Remove the tank door and check the surface of the film. If the surface of the film, milky spots were seen, the fix step is not complete, thus the reel must be returned to the tank, and repeat the fix step for another few minutes. Otherwise, do a final rinse.
7– Whatever the final rinse longer and be more accurate, negative life will be longer.
8– Immerse and then remove the reel to photo–flo solution.
9– Remove the film from reel, and attached to both sides film Clips. Slowly, clean now water on the film surface by soft sponge, and hung to dry in a place free from dust.
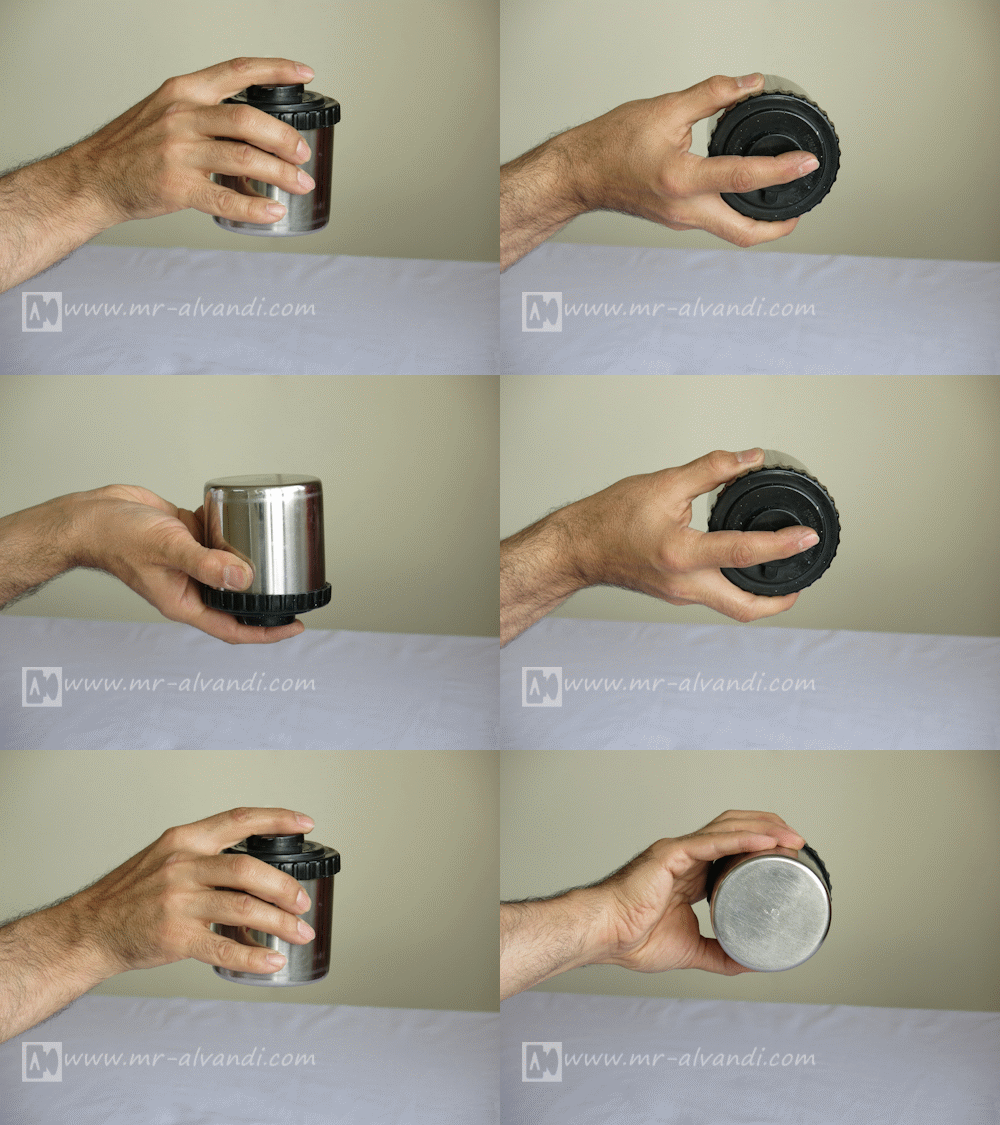
During developing of film, you must shaking developing tank, similar below image:
Quality control of the negatives
Admitted, it determines the quality of the negatives, difficult and needs to experience. But in normal circumstances, if a good negatives put on a newspaper, the big headlines, should not be visible from dark areas of negatives.
A few helpful advice:
— Initially, I recommend that, you choose a standard way for your work. Well as record steps and results for each negative.
— During the preparation of chemical solutions, while a matter is not resolved, do not add other material.
— To bring the volume of a solution to 1 liter, before preparation of the solution, first, pour the exact amount of 1 liter of water inside the bottle, and measure water level in the bottle and put a sign on the outer wall of bottles. Then, when preparation the solution, the final volume of the solution to make the sign of the water.
— Always use each bottle only for an solution.
— Keep the cleanliness.

